What about something on ride height and ZPS shocks


|
|
What about something on ride height and ZPS shocks

 Hung Racing Engines LLC
Ride Height-"there is no magic number" ~L Sommers of GT Thunder
Chasing that magic number without properly setting up your sag on a shock could possibly lead to a set up that is not set right!
I will find my post on how to set race sag also.
As for ZPS, it is just one of the many names used by different companies. All it stands for is Zero Preload System..........99.9% sure on that!
Senior Member

http://www.can-amds450.com/
i saw this on www.quadsonly.com its new can am site and has interesting video on thier suspention and some explanation,and test rider Jeremy Shells input
05 450r
 At least mines paid for!
Ok so here we go for installment #2. I will discuss castor and camber per zrpilots request. I have not been able to get a digi cam since last time, so I quickly drew something up in autocad to illustrate the ideas, I think the drawings will also help to firm up the grasp on the concepts of the first discussion. So here we go.
Castor:
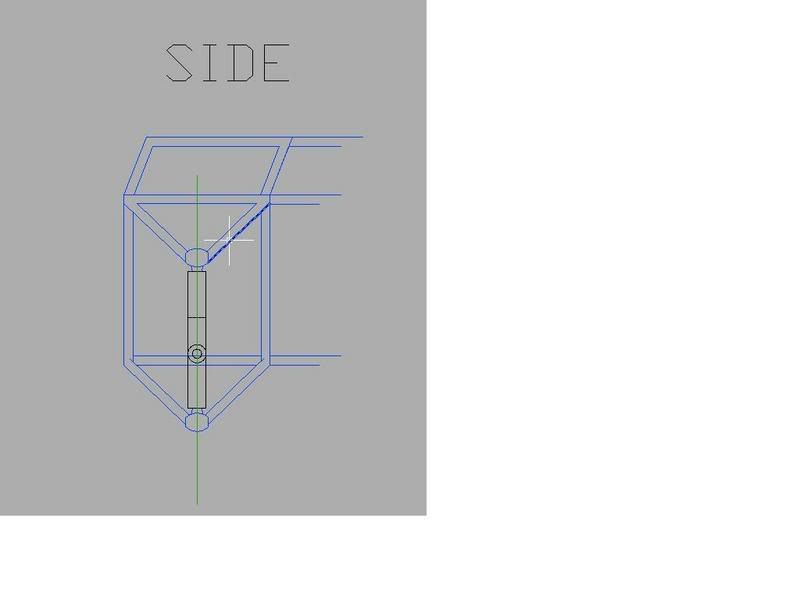
In simplest terms, to understand what castor is, stand on the side of your quad facing the front wheel. Take off the wheel. Now you will be looking at your hub and spindle area. If you look at the imaginary line here that is drawn through the balljoints attached to the spindle, this will be your castor in degrees. Castor plays a very big part in handling. This is your steering axis. Having the two balljoints perfectly in line is "0" castor. If you were to move the upper balljoint farther forward than the lower, this would be negative castor. Negative castor will make your handling very precise, but will also make it somewhat twitchy. There is a fine line there. If you were to move the lower balljoint farther forward than the upper, this would be positive castor, and this makes your quad much more stable at speed. Positive castor is recommended for nearly all applications on our quads, but there are special circumstances, and if you have adjustable arms on your quad, it is something I think you should play with to get a feel for how your quad will handle. Below is a picture from the side of the quad (bare with me here) The blue represents the frame and a-arms, the black is the spindle, and the green line is the imaginary line through the balljoints.
Castor adjustability is usually an upgraded option on aftermarket a-arms. Some arms come with it and others dont. It is usually adjusted using heims on the upper a-arms where they connect to the frame.
Camber:
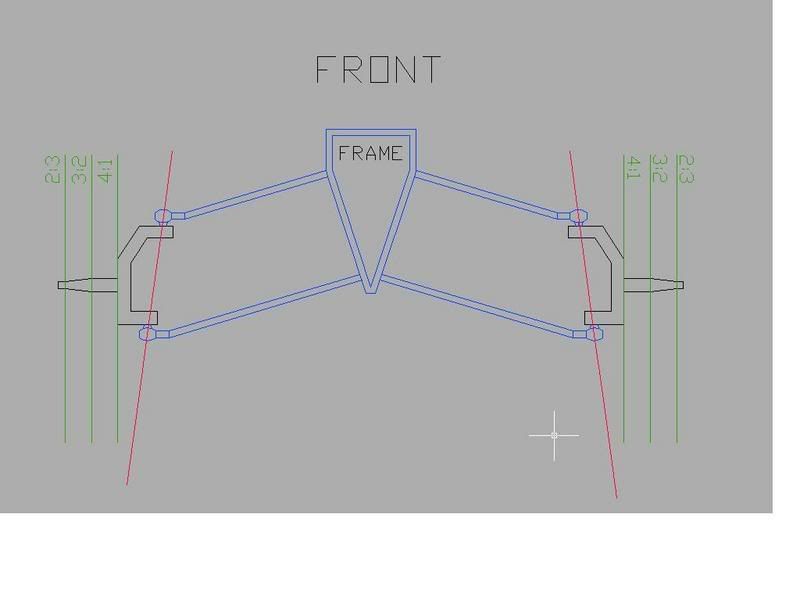
Camber seems to be slightly more understood than castor, and the only reason I can think of is more a-arms come with this adjustability. None the less, camber, in simplest terms, is best understood by standing in front of the atv looking at a wheel. It is angle of the wheel in relation to vertical. Same concept as castor, only now you are looking straight instead of from the side. This too is adjusted through use of balljoints and heims on the arm, however the measurement should be taken at the wheel. I drew this in my drawing somewhat so you can understand. The balljoints have their own angle set shown in the red line, BUT, this is not your camber, your camber is measured at the wheel. The wheels are represented by the green lines. If the top of the wheel points in towards the frame, this is said to be negative camber. If the tire points out, positive camber. Negative camber is what is most commonly used in our sport, and I honestly cant think of a use for positive camber. The idea behind camber is that when you are railing a corner hard (and we've all seen pics on this site) your tire will actually flex causing the tread to almost roll under the wheel. By adding camber, when the tire flexes like this in a turn, you are putting more of the tread in contact with the ground. Very important for handling. Again this is also something I recommend playing with (for those of you with this adjustment) to see how your quad reacts to different camber settings.
I also took this opportunity to illustrate the effects of offset wheels. To have optimum handling you would want your centerline of your wheel to intersect with the imaginary line through the balljoints. Now I know this is not drawn to scale and my measurements are all made up, but it is perfect to look at and grasp the concept. The red line again is the imaginary line through the balljoints, and the green line represent the wheels and your camber. They are all drawn at "0" camber. The 4:1 offset wheel is the closest to the red line, which means it will be the easiest steering and the best handling. The 2:3 offset is the furthest away, it will have the most tip over resistance but at a negative cost of poor handling and also offering a lot of unwanted feedback through the handlebars, as there is more leverage on your arms. Here is the picture:
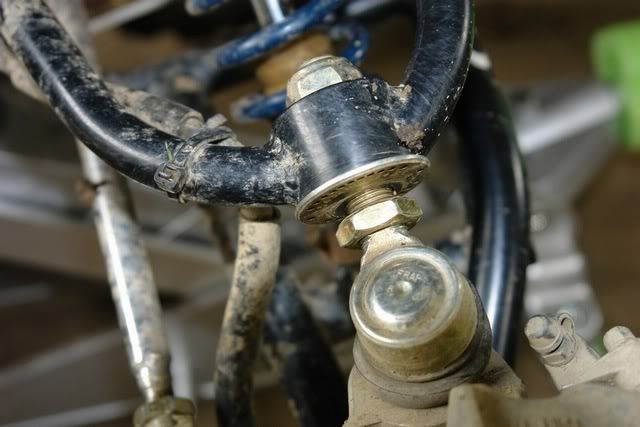
Aftermarket companies such as Houser have made many great strides in the ability to easily adjust these very important attributes to handling. Slicast was the first, and I also believe Santo Derisi developed arms similar to this at around the same time. Slicast arms use an eccentric adjuster, much like the way you would adjust the chain on a Honda style swinger. Rotate it to pull it back one way, rotate the other way to bring the carrier forward. Well this adjuster is placed on the upper arm where the balljoint attaches to the spindle. You simply unbolt it, pull it slightly out from the locating pin, and turn it. This will move the balljoint forward or backwards. This is one of the simplest ideas for castor adjustments, and also very time saving, where before many would have to unbolt at least one if not both heims on the upper arm at the frame, twist them in and/or out, bolt them back up and remeasure. Here is a pic of the setup, though Im sure most have seen it already. Better pics are available throughout the net...
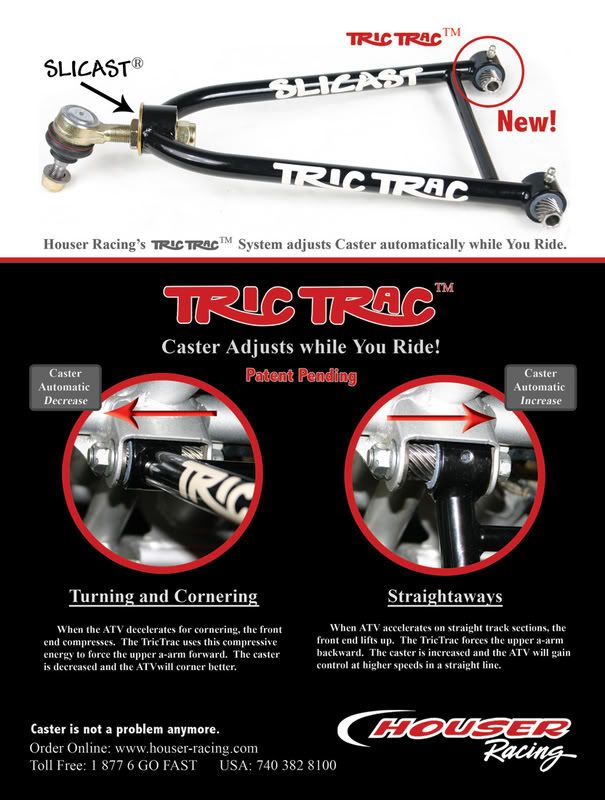
Houser has now also come out with an automatic castor adjuster. The tric trac. I know, I know, I probably sound like a walking billboard for Houser, but in reality, I'm not a fan of the tric trac, but I can appreciate the ingenuity that went into this. I also feel that it does have its place, but its not on an MX track, I think this setup is ideal for TT or flat track. The upper arm is on a set of helical gears if you will. As the arm moves up (diving into a corner or on the brakes) the upper arm is moved forward, giving you negative castor and making your steering very precise. As you accelerate and the arms droop a bit, the upper arm moves back giving you negative castor and making your atv more stable. Seems like a great idea right? Well it is, however what happens when you skim over the top of a set of whoops, or you flat land a 65 foot jump? Your steering becomes twitchy. This is my speculation as I have not tried a set of these arms out for myself, but testimonials from sponsored riders say they do not feel this twitchiness at all, which would also make me believe either A) they dont feel twitchy when jumping or skimming whoops, and you probably dont notice anything in the corners either or B) you feel it in the corners and its also very twitchy on jumps and whoops. Again this is my speculation and not something I have actually tried. I do believe these would be perfect for TT racers or flat trackers though. Here is a pic for those living under a rock:
Well I suppose this concludes this discussion on castor and camber for now. If anyone has any questions feel free to ask away, and if anyone has anything they would like to add or dispute, again, post away. I'm glad my 6000th post was an informative one!
I found this online somewhere but it is perfect for this discussion, I modded it to fit ATV'ers:
Also remember ATV manufacturers will always have recommended toe, castor, and camber settings. They arrived at these numbers through exhaustive testing. Yet the goals of the manufacturer were probably different from yours. And what works best at one race track may be off the mark at another. So the "proper" alignment settings are best determined by you-it all boils down to testing and experimentation.
M-Dub
Quadless as of now
05 KLX110 - some stuff
01 ZR600 - bone stock
1992 LT80 - pitquad I guess?
So far the people that have SCREWED me on here:
powerband
and yamablaster24 more yamablaster24
Remember every time you run wheel spacers or flipped rims... god kills a kitten
"The best you have ridden is the best you know" Paul Thede- RaceTech
Ignorance is NOT bliss -- it's embarrassing and counter-productive
Experience is a tough teacher she gives the test first the lesson afterwards
RIP 606
Senior Member
what effect do shock lengths and lower a-arm shock locations ,and motion ratios have ,seems like a longer shock would hold more oil and stay cooler longer,i know a 16 -inch shock can be set up to have as much travel as a 20.5 shock,some manufacturers ,example leagers ,epic,houser mount shock below lower arm , example roll,holz gibson mount on top and all use different length shocks
05 450r
At least mines paid for!
What you are referring to is mostly known as long travel and standard travel. Shock mounts are determined by the arm manufacturers, they then call a shock company to design a shock to work for the arm. Travel is limited by balljoints/heim joints and tie rod ends. They can only travel oh so far before binding. The pro-traxx setup was made to eliminate binding for the most travel, but honestly how much travel do you really need, or how much can you really use on an atv? For basic understandings of "long shock" and standard travel applications you can try searching on here for the time being, but I suppose this could be the next topic of discussion. Is there any specific questions you had pertaining to shock length? Shock length is usually more beneficial for the simple fact that they are easier to tune. I'm willing to bet 75% of the people on this site cant tune a shock to the full capability of a standard travel shock and waste a lot of money on long travel shocks. I personally dont feel like I can tune past the abilities of a standard travel shock, and see no need for the long travel, at this point in time, and for my level of racing. Others can however and some do actually benefit from long travel. I believe the term long travel should be thrown out the window as it confuses a lot of beginners. It should be called long shock, because realisitcally this is all it is. It is a longer shock with a lower mounting point on the a-arm. Think of it as shooting an arrow at a dinner plate, or shooting an arrow at a trampoline. The dinner plate being the standard travel and the trampoline being long travel. The trampoline is the easier target to hit, and the long travel is easier to pin point problem areas throughout travel. IMO! I am just a weekend warrior and an extreme enthusiast, with a small budget, so Ill keep shooting at my dinner plate for now. Anything else you were wondering about?Originally posted by trx250r180
what effect do shock lengths and lower a-arm shock locations ,and motion ratios have ,seems like a longer shock would hold more oil and stay cooler longer,i know a 16 -inch shock can be set up to have as much travel as a 20.5 shock,some manufacturers ,example leagers ,epic,houser mount shock below lower arm , example roll,holz gibson mount on top and all use different length shocks
M-Dub
Quadless as of now
05 KLX110 - some stuff
01 ZR600 - bone stock
1992 LT80 - pitquad I guess?
So far the people that have SCREWED me on here:
powerband
and yamablaster24 more yamablaster24
Remember every time you run wheel spacers or flipped rims... god kills a kitten
"The best you have ridden is the best you know" Paul Thede- RaceTech
Ignorance is NOT bliss -- it's embarrassing and counter-productive
Experience is a tough teacher she gives the test first the lesson afterwards
RIP 606
 In Quads We Trust
Wow. I feel much more knowledgeable about suspension setups now. I've heard explanations about caster, camber, toe, etc. but you made it very simple to understand and pictures help a lot ... thanks. Very good info!
Sponsored by Dirt Fiend Racing (DFR) of Mesa, AZ ~
2004 Honda TRX400EX (RED)
PEP, Hydrodynamics, Lonestar Racing, Rath Racing, Pro Armor, Pro Taper, ASV, Streamline
2009 KTM 450SX ATV (ORANGE)
Fox Racing Shox, Lonestar Racing, Precision, Houser, Motoworks, Hiper, Fuel Customs
In Quads We Trust
Wow. I feel much more knowledgeable about suspension setups now. I've heard explanations about caster, camber, toe, etc. but you made it very simple to understand and pictures help a lot ... thanks. Very good info!
I would like to hear your opinions on the mounting location of shocks on aftermarket a-arms. I find it interesting how some manufacturers place the mounting bracket very close to the ball joint positioning the shock at an extreme angle whereas others move the mounting point closer to the frame positioning the shock more upright. I've heard that more upright is better because it allows more use of the shock's travel. Any comments?
Sponsored by Dirt Fiend Racing (DFR) of Mesa, AZ ~
2004 Honda TRX400EX (RED)
PEP, Hydrodynamics, Lonestar Racing, Rath Racing, Pro Armor, Pro Taper, ASV, Streamline
2009 KTM 450SX ATV (ORANGE)
Fox Racing Shox, Lonestar Racing, Precision, Houser, Motoworks, Hiper, Fuel Customs
At least mines paid for!
Well this could go both ways. This is esentially the same idea as the difference between standard travel and long travel. Most standard travel setups place the shock roughly at midpoint on the lower a-arm. Most long travel set ups place the shock closer to the balljoint as you have said. This means the same amount of movement of wheel travel on both setups will yield more shock travel on the long travel setup and less travel on the standard setup. This is what makes the long travel shock easier to tune, there is more travel going on at the shock for the same amount of wheel travel. Now something to think about is if you could use the same amount of shock travel as a long travel setup and move it further in, you could gain more wheel travel. This is not something easily done on our atvs as tire sizes, ride height and frame design all limit travel. Like I said before how much travel do you need and how much can you actually use?Originally posted by 04TRX400EX
I would like to hear your opinions on the mounting location of shocks on aftermarket a-arms. I find it interesting how some manufacturers place the mounting bracket very close to the ball joint positioning the shock at an extreme angle whereas others move the mounting point closer to the frame positioning the shock more upright. I've heard that more upright is better because it allows more use of the shock's travel. Any comments?
also to clarify, wheel travel refers to the amount the wheel itself moves vertically, and shock travel refers to how much the shock shaft moves in and out of the shock housing. Wheel travel can also be deceiving too, because many manufacturers (Honda/Yamaha) measure the arc that the wheel travels, and not true vertical travel. The wheel actually forms an arc when being moved up and down because of the relative length of the a-arms. Try it, pop off a shock on the front with the wheels off the ground and cycle it through your suspension.
M-Dub
Quadless as of now
05 KLX110 - some stuff
01 ZR600 - bone stock
1992 LT80 - pitquad I guess?
So far the people that have SCREWED me on here:
powerband
and yamablaster24 more yamablaster24
Remember every time you run wheel spacers or flipped rims... god kills a kitten
"The best you have ridden is the best you know" Paul Thede- RaceTech
Ignorance is NOT bliss -- it's embarrassing and counter-productive
Experience is a tough teacher she gives the test first the lesson afterwards
RIP 606
Senior Member
I own the Diamond J Customs A-Arm extension pkg. I got the 4".
First off comes installation. Be aware that the 4" extension is four inches PER SIDE; NOT OVERALL. The install was on a 400ex. The install went pretty smooth. Essentially, the a-arms and upper shock mounts are move outward from the frame 4". The plate pieces lined up perfectly. As I tightened them down the frame brackets did bend just a bit. But nothing that couldn't easily be fixed with a pair of lock-jaws in the event I wanted to take them off. The brake lines must be unclipped from the a-arms and the c-clips on the calipers. The banjo bolt does fine without the extra clamps. When the quad is lifted from the ground and the tires turned so-as to pull the brake lines tight, the lines are long enough to do the job. BUT THAT'S IT. Another 1/2 inch and the lines would be so tight as-to-be unsafe. So it'll work in the typical jumping and twisting. But in a crash, all bets are off. A stock oil tank won't interfere with install. But if you have an aftermarket high-capacity tank, well... better get some longer tank bolts and some spacers... say... 1/4 inch. That'll make the a-arm extension brackets clear the tank by 2 or 3 millimeters. The instructions were woefully poor. But a mechanically inclined person could do it. You must layout all parts very carefully before installing. Install takes about 4 hrs. The bolts are 1.5 inches longer than they need to be and I was short a couple of washers. But neither of those issues were any problem.
After install came ride time. Moving the a-arms out 4" softened the shocks up front.. that's for sure! But it was nothing the couldn't be compensated for by even a medeocre rider. Stiffen the shocks by adjusting them.
The 400ex handles MUCH better now. There's very little lean when you're in a corner. The quad likes to track flat when you're going around anything.
I'm slowly increasing the air on my jumps and I'm detecting no stress as of yet. The metal on those brackets is 1/4 inch thick. So that ought to handle just about anything.
The trade off is in the tight trails. An extra 8" in width is quite a bit. Be careful. Watch out for those trees.
 Posting Permissions

 Reply With Quote