

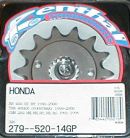
Renthal 14 tooth front sprocket
 After talking with many 400EX owners, it seemed that there
was always one common statement from at least 80% of them.
"Drop one tooth on the front sprocket" seemed to be a highly
recommended modification from everyone that I talked with.
After talking with many 400EX owners, it seemed that there
was always one common statement from at least 80% of them.
"Drop one tooth on the front sprocket" seemed to be a highly
recommended modification from everyone that I talked with.
Curiosity finally got the better of me,
and I decided to order a sprocket and find out for myself.
1st gear always seemed a bit high for the really tight stuff,
and when doing some serious hill climbing 2nd was to low,
and 3rd was just a tad bit to high. I ordered my sprocket
online from Rocky Mountain ATV, and as usual it was here within
a week.
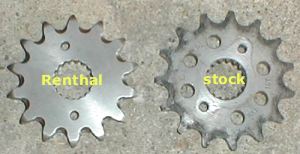 I decided to go with the slightly more expensive (but undoubtedly
higher quality) Renthal sprocket. My experiences with other
ATVs has taught me that cheap chains/sprockets just aren't
worth it, and tend to wear out very quickly. I was surprised
by the quality of the Renthal sprocket. The machining was
excellent. The Renthal sprocket appears to be even higher
quality than the original equipment Honda sprocket.
I decided to go with the slightly more expensive (but undoubtedly
higher quality) Renthal sprocket. My experiences with other
ATVs has taught me that cheap chains/sprockets just aren't
worth it, and tend to wear out very quickly. I was surprised
by the quality of the Renthal sprocket. The machining was
excellent. The Renthal sprocket appears to be even higher
quality than the original equipment Honda sprocket.
 Installation proved to be trouble free, and took less than
15 minutes (including stopping to take pictures along the
way). Only basic hand tools are required, a 10mm socket, 8mm
socket, and the allen wrench from your EX's tool kit are all
that you need. I recommend using a torque wrench to tighten
the swing-arm pinch bolts, so a torque wrench capable of measuring
15 ft/lbs and an allen head socket are also recommended. I
also recommend using the 'blue' medium strength Loc-Tite on
all fasteners to prevent them from vibrating out. Nothing
is worse than loosing a good day of riding due to a critical
bolt that has vibrated out and been lost on the side of the
trail.
Installation proved to be trouble free, and took less than
15 minutes (including stopping to take pictures along the
way). Only basic hand tools are required, a 10mm socket, 8mm
socket, and the allen wrench from your EX's tool kit are all
that you need. I recommend using a torque wrench to tighten
the swing-arm pinch bolts, so a torque wrench capable of measuring
15 ft/lbs and an allen head socket are also recommended. I
also recommend using the 'blue' medium strength Loc-Tite on
all fasteners to prevent them from vibrating out. Nothing
is worse than loosing a good day of riding due to a critical
bolt that has vibrated out and been lost on the side of the
trail.
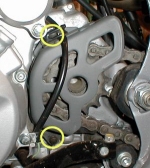
 To begin installation, unplug the neutral switch (just below
the sprocket guard), bend the tabs that hold the wire in place,
and move it up and out of the way. Now remove the two 8mm
bolts that secure the sprocket guard to the motor case. Loosen
the two 10mm bolts that secure the sprocket retainer to the
sprocket. (It's easer to loosen the 10mm bolts while the chain
is still on because you can use the parking brake to hold
the sprockets/chain from moving.)
To begin installation, unplug the neutral switch (just below
the sprocket guard), bend the tabs that hold the wire in place,
and move it up and out of the way. Now remove the two 8mm
bolts that secure the sprocket guard to the motor case. Loosen
the two 10mm bolts that secure the sprocket retainer to the
sprocket. (It's easer to loosen the 10mm bolts while the chain
is still on because you can use the parking brake to hold
the sprockets/chain from moving.)
Time to loosen the chain. The axle carrier
is held in position by 4 allen head bolts on the back of the
swing-arm. Loosen each pinch bolt a bit at a time to prevent
cracking of the swing-arm. With the 4 pinch bolts loose you
should be able to rotate the axle carrier forward. This loosens
the drive chain.
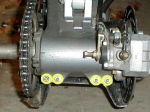 With the chain slack, remove the two bolts and sprocket retainer
from the drive sprocket. To remove the retainer just turn
it a bit until it can be slid off the output shaft splines.
With enough slack in the chain, you should now be able to
slide the sprocket off the output shaft also.
With the chain slack, remove the two bolts and sprocket retainer
from the drive sprocket. To remove the retainer just turn
it a bit until it can be slid off the output shaft splines.
With enough slack in the chain, you should now be able to
slide the sprocket off the output shaft also.
To install your new sprocket reverse the
removal instructions. Make sure to re-adjust the drive chain
slack. The sticker on my EX says 1 1/3 in. slack. The service
manual gives a range between 1 ¼ and 1 5/8 in. Be sure to
use a drop of blue Loc-Tite on all fasteners you removed.
The torque spec for the rear swing-arm pinch bolts is 15 ft/lbs.
Make sure after riding for a few minutes to recheck all fasteners
and the chain slack. My initial ride impressions were quite
favorable. 1st gear is now much better in the really tough
stuff. Exiting sharp corners where I previously had to downshift
from 3rd to 2nd I could now stay in 3rd gear without the engine
bogging down. I did notice a slight loss of top end speed,
unfortunately my GPS is on the fritz so until I can borrow
one I don't have any hard numbers of how much top speed is
lost. I suspect it isn't much.
I haven't yet had a chance to really get
some seat time in since I installed the sprocket. The people
I have spoken with said that BIG hill climbs would show the
greatest improvement, as soon as I get to try it out on our
local hill climb I will post the results.
|


