
Honda 400EX Engine
Oil Change Instructions
Has it been a while since you have taken your 400EX to the shop for an oil and filter change? Tired of paying outrageous dealer prices to have it done? Read on to find out how you can change your own oil and filter, save money, and perhaps have a bit of fun in the process.
 The first thing you need to do is gather a few hand tools. You will need 8mm, 12mm and 14mm sockets, and extension, and a ratchet. I prefer to use a torque wrench to tighten drain plugs, as it prevents over-tightening them. You will also need something to drain the oil into. A long nose funnel is recommended to make refilling the oil tank easier. My personal favorite for a funnel to use is the NAPA 'clean funnel' (NAPA part number 720-1087). It has covers that screw onto each end of the funnel. This is great because it prevents dirt/dust from getting all over the inside of the funnel when it's not in use, so you don't have to clean it every time before you use it.
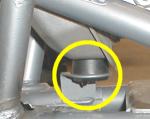 The first thing you need to do is drain the oil tank. The drain plug is located on the bottom of the tank. When removing the drain plug, be careful not to lose the sealing washer. If you don't re-install the washer with the bolt, it will very likely leak. When the oil finishes draining out of the tank, re install the drain plug. The specified torque for the tank drain plug is 14 ft/lbs
 Now you need to remove the crankcase drain plug. It also has a sealing washer so make sure to look for it. When the crankcase finishes draining re-install the plug. The specified torque for the crankcase drain is 16 ft/lbs.
 Time to change the filter! Start by removing the 2 8mm bolts that secure the filter cover. After you take the cover off, carefully inspect the o-ring that seals it to the block. If the o-ring is cut or damaged in any way replace it. Pay special attention to the way the filter is sitting in the motor. The rubber seal on the filter must face out, or serious engine damage will result. Now remove the filter from the engine. Behind the filter is a spring, make sure to re-install it, before putting the new filter in.
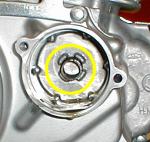  The proper steps for re-assembly are the spring, then the filter (with the rubber seal facing out) then the cover. Then re install the filter cover bolts. The long bolt goes toward the front of the motor, and the short bolt goes toward the rear of the motor. Tighten the bolts securely. The proper steps for re-assembly are the spring, then the filter (with the rubber seal facing out) then the cover. Then re install the filter cover bolts. The long bolt goes toward the front of the motor, and the short bolt goes toward the rear of the motor. Tighten the bolts securely.
Now it's time to refill the engine with oil. With a filter change the capacity of the 400EX motor is 1.95 quarts. Start by filling the oil tank with approximately 1 4/5 quart of oil. Run the engine at idle for a few minutes (while watching carefully for leaks). Stop the motor, and top the oil level off to the full mark. Consult your owners manual for the proper viscosity oil to use, as it depends on the ambient temperatures in your area.
Congratulations! You just finished changing your 400's oil! This would be a great time to do a few other basic maintenance items like cleaning the air filter, adjusting the chain slack, and checking the tire pressure.
|


